Introduction
jKılavuz is the first and only available path engine for Java. It consists of an extensible set of tools for collecting pathfind data and finding and executing paths. Despite the complexness of subject it is designed for ease of use. jKılavuz is written in Java 5 and is pure Java. jKılavuz is targeted, but not limited to games development.
There are numerous good algorithms for determining a path given a connectivity graph. The actual problem is creating a connectivity graph which correctly represents the enviroment. For simple 2D games the connectivity graph was a side affect of the tiling system used to create the map. For 3D games, especially those constructed from arbitrary geometry, no such simple solution exists. jKılavuz is meant to solve this problem.
FloodFill and Grid
To collect pathfind data, jKılavuz flood fills over surface starting from a set of points on the ground. This way a kind of 2d grid in 3d space is created which can take us up or down slopes, across bridges and over and under overpasses. The process also takes care of jumping over obstacles and gaps. As a nice side effect flood filling also spots the locations on the map where the units aren't supposed to go.
All this is done by the FloodFill class. Indeed the FloodFill
class only organizes the flood fill process. Actual reachability checks
is delegated to an interface called StepChecker. FloodFill
decides which direction to check and also makes sure values returned by
StepChecker are in proper range. jKılavuz provides a
default implementation of StepChecker depending on jPCT's
collision detection system but one can easily plug his own collision detection
engine.
For simple maps only a starting point is sufficient. Multiple starting points are used for cases where flood fill can not reach certain parts of the map. For example a two floor building where upstairs can only be raeched by an elevator. Note if there are stairs connecting the two floors, flood fill finds its way down or up through the stairs.
Flood filling is only done in cardinal directions. Diagonal movements are not checked and indeed not necessary.
The result of flood filling is the Grid which is essentially
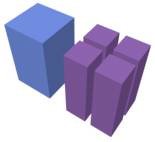
consists of cells which are square prism shaped. Height of the prism should
be as much as your unit's height. The cell size is the size of a side
of the square. Cell size is quite important to correctly represent the
terrain. The recommended size is half width of your unit's bounding box.
Take the wider side of your unit's bounding box and use half of it. The
following figure shows a unit's bounding box and the corresponding cell.
Note the smaller the cell size the more time and memory consuming flood
filling is. Also note small cell size does barely effect the size of runtime
path find data as all cell information is discarded there.
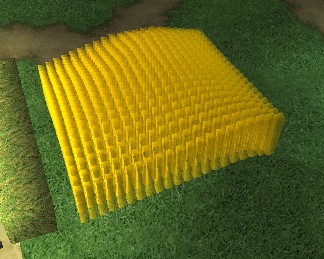
The following figure shows a part of a grid created for a terrain where elevation changes. Note how nicely the cells fit onto terrain:
The constructed Grid is a massive data structure with cells
referencing neighbour cells. Thanks to Java serialization mechanism to
store and reload that massive object graph. An implementation note, for
large grids default serialization breaks with StackOverFlowError
since there are many many circular references between cells. To overcome
this, references to neighbours cells are discarded and only id's of neighbour
cells are serialized. During de-serialization neighbours are restored
again.
Flood filling to construct a grid is a quite time consuming process especially on large maps. As it's impossible to create custom sectors once grid is sectorized it's strongly recommended to backup your grid instances before sectorizing them.
As grid storage depends on java serialization and future versions may not be compatible with current version, it's also recommended to backup code or script pieces which creates the grid.
Sectors and Portals
Once the flood fill is completed, the created grid is analyzed and sectors and portals are created. A sector is a rectangular region which is freely traversable: that is a unit can go in any direction in a sector without any action. The sector and portal creation is fully automatized although users can intervene for special purposes. During sectorization several tricks are used to form nicely shaped sectors: i.e. to avoid long and thin sectors. The bounding box of a sector is the smallest rectangular prism covering all the cells.
Custom (user defined) sectors can only be created before grid is sectorized. Typically custom sectors are created for regions where you want the sector to be of a certain shape. For example you may want to create a sector from all the cells a door's volume covers. Later you may enable/disable portals leading that sector to emulate door's state: open or closed. If we don't create a custom sector there, default sectorization may create wider or smaller sectors there and we may not precisely enable/disable passing through the required region.
Grid.createSector(Collection<Grid.Cell>) is used to
create a custom sector. The required cells can be retrieved by Grid.getCellsAt(float[]
bounds) which returns all cells intersects with given bounds. Note
the cells must form a rectangular region and conform to freely traversable
rule.
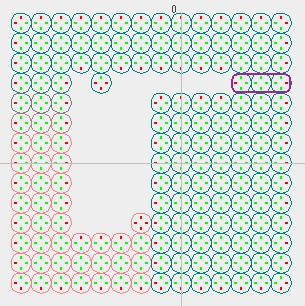
The following image shows such a custom sector created for a door:
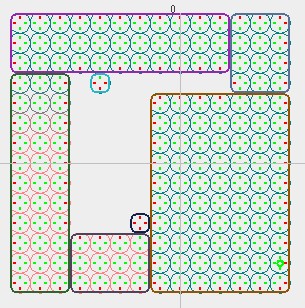
And this is what default sectorization created. These two images are from the door sample:
A portal is a line of (generally) border cells which leads to same sector
with same action. The portals created by Grid.sectorize()
method are always on borders of sectors. There are 2 types of portals:
regular and non-regular. A regular portal is a portal which is created
during flood fill and leads to an adjacent sector. A non-regular portal
may be anywhere in a sector and may lead to any other sector in the grid.
Teleporters and elevators are examples of such portals. Note jump ahead
portals are also created by flood fill but are not regular portals.
Grid.createPortal(Grid.Cell from, Grid.Cell to, short action)
is used to create a custom portal. Action is a game/content specific identifier
defining what action to take to pass through this portal, like elevator
action, teleport action etc.
Land
The Grid is a huge data structure possibly covering megabytes of space
for a moderate sized map. This is where the Land came into
sight. Land is the compact form of our path find data which
is used at runtime. A Land is essentially created from a Grid. It is the
stripped form of grid where all the cell information is discarded. Similar
to grid it also contains sectors and portals but all are in bounding box
form. The sectors and portals of Land has the same id's of their Grid
counterparts.
Land also stores elevations of cells. This is necessary to calculate the elevation of an arbirtaty point in the Land. The elevation of a point is interpolated among 4 cell points surrounding it. Elevations are stored as 2 dimensional float arrays. Note as a size optimization, if all cells of a sector are at same elevation only a single value is stored.
All coordinates in Land are in grid space. That is, the land point corresponding
to our first starting point is (0,0), a cell width north of it is (0,1)
etc. Land.getPoint(Vector3) is used to retrieve points in
Land. The Vector argument is the location in world space. Land.Point
also holds a reference to sector it belongs to.
Path finding
Path finding is performed among sectors. AStar class is
the one which actually finds paths. It's a generic A* implementation which
is not bound only to sectors. PathContext class encapsulates
information about current path finding unit and is passed as a hint to
AStar and which is in turn passed to AStar.Transition's
for cost calculations. Note Land.Portal implements AStar.Transition.
To find path between two Land.Point's from and to, AStar.findPath(from.sector,
to.sector, PathContext) is used.
One of the fields of PathContext is unitSize
which is the size of unit in grid space. Path finding will not let a unit
go through portals which are narrower than specified unit size. Although
this sounds good at first, it's not recommended to specify large unit
sizes as it will lead to strange paths especially for enviroments with
relatively small sectors/portals. Instead create different Grids/Lands
for different unit sizes.
The following figure shows a problematic case. Here a small path segment found for a unit size of 1 is displayed. However if unit size was more than 1 no path will be found. This is a wrong behaviour and indeed a unit with a size up to 2 can pass through there (as portals are adjacent) but jKılavuz doesnt take that into account. So avoid large unit sizes especially on maps with relatively small sectors/portals.
Paths and PathIterator
In a typical game finding a path among sectors is not sufficient. One
should have the necessary tools to actually execute (follow over time)
the path. Fortunately jKılavuz has built in support for that. PathIterator
is an interface which allows iterating over paths over time. It's suitable
for both fixed and delta time approaches which are quite common in game
industry. The typical usage is as follows, the code piece is called
every frame:
    if (pathIterator.hasNext()) {
        PathPosition position = pathIterator.next(passedSecondsSinceLastFrame);
        Unit.setLocation(position.location);
        Unit.setDirection(position.direction);
        Unit.animate(position.animation);
    }
Various implementations of PathIterator is retrieved from
static methods of Paths class.
For example to get a curved path Paths.curvedPath(Land.Point first,
AStar.Path path, Land.Point last, Vector3 currentDirection, Vector3 lastDirection,
PortalPasser portalPasser) is used. The first and last points are
our unit's current and destination points. Path is the path found by AStar.
The current and last directions are our unit's current direction and required
direction at destination point. The curvature of path is defined by distanceToEdges
field of PathContext. The created path will try to stay away
distanceToEdges units from corners and sides where possible.
Note the created path is guaranteed to stay in sectors of the original
path.
PortalPasser is a factory interface to create path segments
for portals which require specific action. Remember how we were able to
define a custom portal for some game/content specific action like an elevator.
jKılavuz can not know how to pass through a such portal so it delegates
the job to PortalPasser. This way one can plug his own game/content
specific path segments like press the elevator button, wait for the elevator
to come, get on elevator, go upstairs, get off elevator, etc. See elevator
sample for an implementation. If PortalPasser is null or
it returns null for a path segment the default PortalPasser
is used which just skips to last position.
Paths class also provides several methods to create path
segments. Some of them accepts Land.Point's as parameters
while others accept Vector3's. The formers take elevations
into account while the laters dont. Path segments can be merged into a
single one by Paths.mergePaths(List<PathIterator>)
method. Using these Lego like segments one can build his own path if built-in
methods are not sufficient.
Paths.pathPoints(...) is provided for those who doesnt need
a PathIterator but the way points on the path. This method
generates the corner points of a path which a unit can go straight. Optionally
it can also generate marker points at sector boundaries.
There are certain situations where a unit should wait in the middle of
a path until some specific event occurs. Waiting for elevator is an example.
The Paths.Condition interface is used for such cases. The
following code piece creates a PathIterator which waits until
elevator comes downstairs:
    PathPosition pathPosition = new PathPosition(...); // the point we wait
    PathIterator waitSegment = Paths.conditionalSegment(pathPosition, new Paths.Condition() {
        public boolean isConditionMet() {
            return elevator.isDownStairs();
        }
    });
Problematic Geometries
The flood filling and finding and executing path methods will work seamlessly on arbitrary geometries. However there are certain geometries which will put you into trouble. The following figure is a side view of such a case:
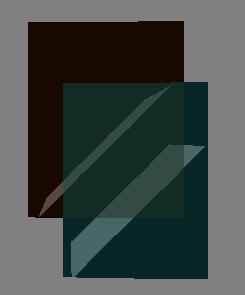
As you see the sectors for down and upstairs intersect. The problem here
is one can not determine the sector of a point in intersected volume.
The Land.getPoint(Vector3) method will return the first sector
the given vector is contained. However if the sector is determined the
rest of the system will work correctly. So to avoid such problems, either
avoid such geometry or keep track of the sector a point belongs to by
yourself.
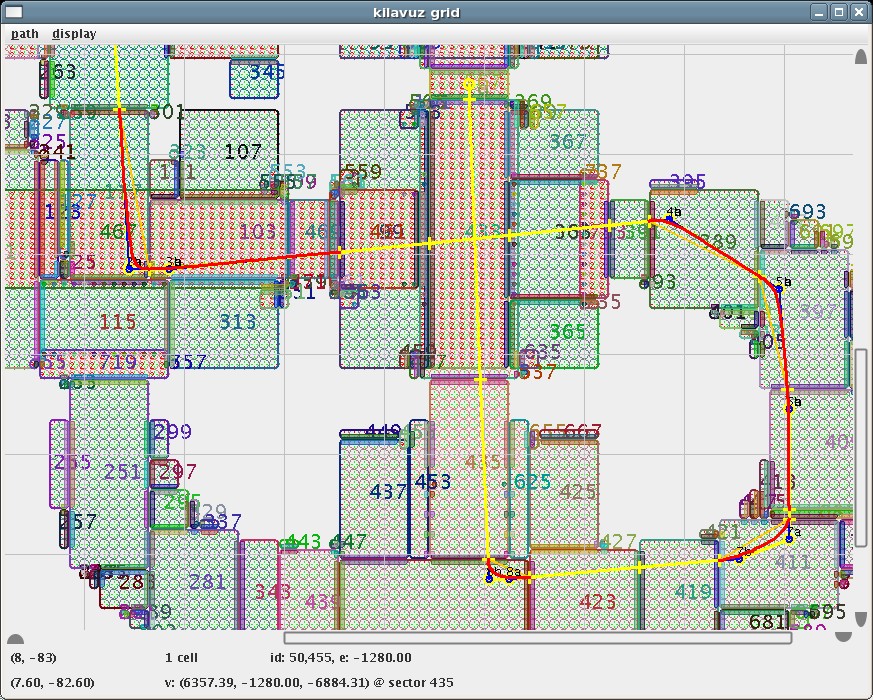
GridPanel
GridPanel is a swing panel to display various information
in a grid. It can display cells, transitions between cells, sectors and
portals in a Grid. It can also visualize path find results displaying
path points, curved path and control points of the curve. Double clicking
on a point will popup a dialog box displaying detailed information about
cells at that point. GridPanel can be used as a standalone
application or embedded in another swing application.
The bin folder has a windows batch file and a shell script for invoking
GridPanel as a standalone application.
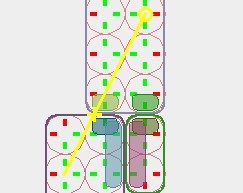
The figure below shows GridPanel displaying a found path. It's from the Quake level used in demo. The yellow line shows the straight path. Yellow circles mark path points and yellow plus signs mark portal exit points. Red line shows curved path and blue line pieces shows control points of curves. Note how straight lines used whereever possible. Also note how the found path seemlessly passes over itself on the second floor.
jPCT Helpers
A few helper classes are provided for jPCT users to ease testing and
prototyping. They can be found in the raft.kilavuz.util.jpct package.
The Visuals class provides static methods to create visual
representations of cells and sectors in a Grid or Land. The Avatar
class is a simple avatar implementation which can perform and coordinate
certain animations. The RenderPanel is a swing panel which
does the rendering job and allow the user to freely move the camera around
or follow an avatar (any Object3D indeed)